
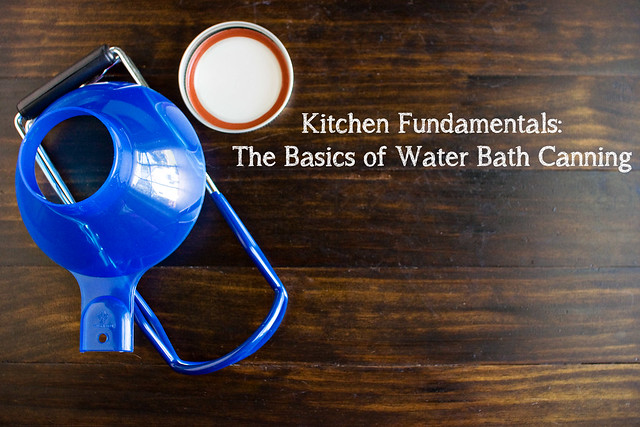
Kitchen Fundamentals: The Basics of Water Bath Canning
Eric and I are really into canning, and I figured it was about time to put together a little tutorial since I’ve got some recipes coming your way soon. We’re all about DIY projects, so it’s only natural that we fell in love with canning as soon as we tried it. We are by no means experts, but we’ve eaten homemade jam and lived to tell about it, so I figure that means we’re doing something right. Seriously, canning is not that difficult if you read and prepare before getting started. Before we made our first batch of jam in 2011, I researched the heck out of canning. I checked out several books from the library and read every reliable internet source I could find. There’s a ton of great information out there (and some not great – please don’t can using your dishwasher), and I thought this would be a good place for me to compile everything I’ve found up until now.
So far, our canning experience is limited to jams, jellies and pickles. Everything we’ve canned has been done in a water bath canner, so that’s what I’m sharing with you today. I think it’s a good place to start, and I hope you guys will give it a try if you haven’t already. If you follow the directions, there’s no need to worry about botulism or some freak canning disaster. Canning is one of those things that definitely seems way harder than it actually is, and you’ll find yourself wondering why you put it off for so long once you finally do it.
Let’s get started!
Supplies:
Large pot with a tight fitting lid and metal rack (We have this one.)
Small pot for simmering the lids
Wide mouth funnel, lid lifter, jar lifter, headspace tool (We have this kit that includes all four.)
Jars, lids and rings
Clean kitchen towels
Ladle
Processing the Jars:
Before getting started, read your recipe thoroughly, make sure all your supplies are nearby and that your jars have been washed. Washing does NOT sterilize the jars, but anything getting processed for 10 minutes or more doesn’t require sterilized jars. You’ll want the jars to be hot before you pack them, so go ahead and add them to your canner or a large stockpot. Submerge them in water and bring to a simmer (180˚F). Keep them simmering until it’s time for them to be filled. You can also wash them in the dishwasher and keep it closed and warm until you need the jars. Place the lids (just the flat lids, not the rings) into a small pot of barely simmering water.
Once the food you’re making is ready to be canned, remove the jars from the water using tongs or a jar lifter and place them onto a clean kitchen towel on your counter. Use the magnetic lid lifter to remove the lids and place them on the towel, as well. There’s no need to dry anything off because the high heat will cause any water to evaporate quickly. Place the wide mouth funnel over a jar and use your ladle to fill it. You need to leave the appropriate amount of headspace (the space between the food and the top of the jar) that the recipe calls for. Repeat with the remaining jars. Once you’ve filled all of your jars, wipe each rim using your clean kitchen towel or a clean, damp paper towel. Place the lids onto the jars and lightly screw the metal ring into place. You don’t want the ring to be too tight because it could prevent air from escaping while processing. Instead, go for “fingertip tight,” which is as tight as you can get it with the tips of your fingers.
Now that your jars are filled, it’s time to process them so that they can get properly sealed. Place the jars into the canning rack, spaced evenly and far enough apart that water can circulate around them. Alternately, you can keep the rack in the pot and place each jar individually using the jar lifter. The water should be at least 1-inch above the tops of the jars. Cover the canner with the lid and start timing as soon as the water reaches a rolling boil. Process the jars for the amount of time indicated in your recipe.
Once the jars are done processing, remove them and place them back onto the towel-lined counter. The jars need to cool at room temperature for 12-24 hours, but you should start to hear the pinging of the jars sealing right away. Once the jars are cool, check the seal of each by checking to see if the lid is concave. If your jar didn’t properly seal, refrigerate it and reprocess within 24 hours or just plan to eat that one first. Any jars that didn’t seal should be refrigerated and consumed in a short amount of time (I’ve seen as little as 2 days and up to 2 weeks, so use your best judgment).
Remove the rings from the jars and store in a cool, dark place for up to 1 year. That’s it – you’ve just finished canning!
Resources:
Like I mentioned earlier, there are a ton of resources out there for canning. I’ve found Virginia’s Cooperative Extension to be incredibly helpful, and there are actually even classes offered in some counties around here. If you’re more of a hands on learner, definitely look into programs in your area. They also have a handy PDF that goes into more detail and even has pictures. The National Center for Home Food Preservation also has several guides for canning and preserving.
I’ve also enjoyed the following books, both for their canning information and delicious recipes:
Food in Jars: Preserving in Small Batches Year-Round
Well Preserved: Third Edition: Small Batch Preserving for the New Cook
The Joy of Jams, Jellies, and Other Sweet Preserves
There are plenty of others, but these have been my go-to guides the past couple of years. Make sure to check your library. Mine had a huge selection of canning books, and that gave me the chance to figure out which ones I wanted to buy. If you have any resources to add to this list, please let me know! I’d also love to hear about what you guys are canning, what you want to see recipes for, etc.
Love this Courtney! I bought a few books to learn about canning and sadly, they’ve just been sitting on my shelf for the past year. Your concise tutorial is just what I needed!
Love this Courtney! I bought a few books to learn about canning and sadly, they’ve just been sitting on my shelf for the past year. Your concise tutorial is just what I needed!
I love both the Ball cookbooks. I have the small magazine size one you can get a Walmart or Target and the bigger “Ball Complete Book of Home Preserving” one. So far I’ve only done jams/jellies and a few jars of salsa and tomato sauce. My dad has a much bigger garden than we do so I luck out and he cans a bunch of stuff for me 🙂 Hoping to try your peach vanilla jam this year along with blueberry jam and syrup (from all our Whole Foods berries!)
I love both the Ball cookbooks. I have the small magazine size one you can get a Walmart or Target and the bigger “Ball Complete Book of Home Preserving” one. So far I’ve only done jams/jellies and a few jars of salsa and tomato sauce. My dad has a much bigger garden than we do so I luck out and he cans a bunch of stuff for me 🙂 Hoping to try your peach vanilla jam this year along with blueberry jam and syrup (from all our Whole Foods berries!)
Courtney, thanks so much for this post! We have gotten overwhelmed by information and chickened out of canning for the past two years – this summer, it’s going to happen with this as our guide 🙂
Courtney, thanks so much for this post! We have gotten overwhelmed by information and chickened out of canning for the past two years – this summer, it’s going to happen with this as our guide 🙂
Thanks for the great tutorial! My mother-in-law gave me a nice canning set a few years ago with a book, but it always seemed so daunting. This post (and a bushel of apples) gave me the encouragement to go ahead and try tonight. Thanks again!
That’s awesome! I hope you had fun. 🙂
It was a blast! I’m looking forward to progressing (slowly) to more items during the various seasons. Making apple butter was a good place to start. Thanks again!