
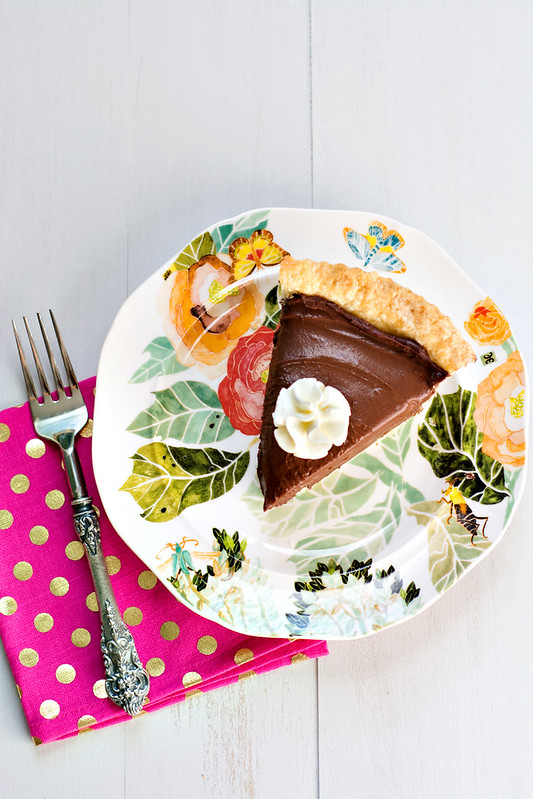
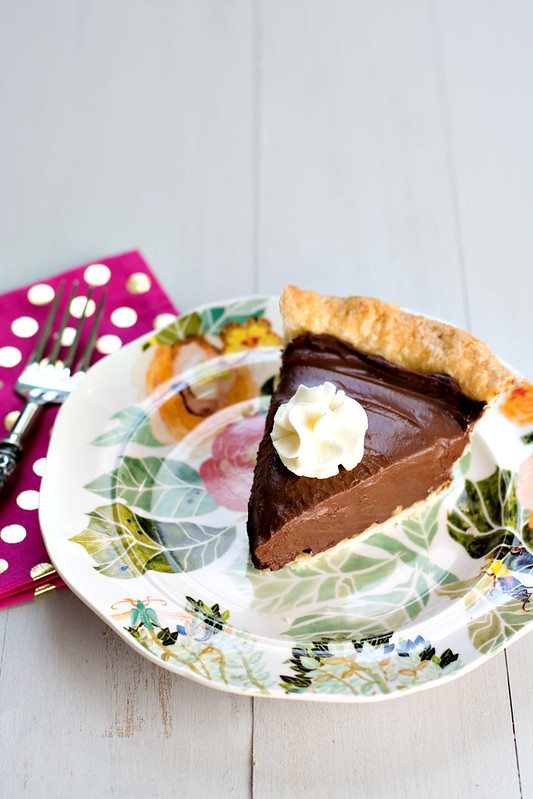
Chocolate Cream Pie
Christmas Eve is only a week away, and that means that 2013 is almost officially over. I can’t even believe it. The past few weeks have been busy for us as we prepare to celebrate (and while we finish up our kitchen renovation). December is always such a mix of emotions for me, for more reasons than you guys probably care to know, so I’m thankful for the distraction the busyness of this season provides.
With all the gatherings we’ve attended the past couple of weeks, we’ve had the opportunity to cook and bake things we don’t normally make unless we’re entertaining a crowd. Case in point: this pie. You may recognize it from Clara’s first birthday party (holy crap, how was that almost a year ago?!), but this is the first time I’ve made it since then. Our friends hosted a holiday party on Saturday, and we took this to share.
Chocolate pie has long been a favorite of Eric’s, and I’m happy to have a recipe that I can whip up for special occasions. When I made this for Clara’s party (in bite-size), I wasn’t sure how much I’d like the filling. Growing up with a severe dislike of chocolate, the thought of an entire pie made of it kind of grossed me out. I’ve since learned the error of my ways (and discovered my love for chocolate), but I still wasn’t completely sold on chocolate pie until I tried this one. With its flaky pie crust and dense, chocolaty filling, this pie is one of the best I’ve eaten. The filling is rich, super smooth and good enough to eat by the spoonful (which I will totally fess up to doing). Top it with some lightly sweetened whipped cream, and you’ve got one heck of a dessert.
- YIELD: 1 9-inch pie
Half recipe pie dough
For the filling:
2 tablespoons unsalted butter
8 ounces semisweet chocolate, chopped
1 teaspoon vanilla extract
⅔ cup granulated sugar
3 tablespoons cornstarch
2 tablespoons unsweetened cocoa powder
1 teaspoon espresso powder, optional
⅛ teaspoon salt
3 large egg yolks
1 cup heavy cream, divided
2 cups milk
For the topping:
1 cup heavy cream
¼ cup confectioners’ sugar
½ teaspoon vanilla extract
- 1
Start by blind baking the pie crust. Heat oven to 400º. Roll the dough on a lightly floured surface into a 13-inch circle. Transfer it to a 9-inch pie pan and trim the edges so that they’re about an inch bigger than the pan. Tuck the edges up and under, then flute them if desired. Freeze the pie dough for 30 minutes to help retain its shape.
- 2
Line the crust with parchment paper and fill with dry beans or pie weights. Bake the crust for 20 minutes, then remove from oven and gently remove the parchment and beans or weights. Return to the oven and continue baking another 10-20 minutes, or until the crust is golden all over. If the edges start to brown too quickly, cover them with foil. Remove from oven and allow the crust to cool completely before filling.
- 3
While the crust is baking, start working on the filling. Place the chocolate, butter and vanilla in a 2-quart mixing bowl and set aside.
- 4
Whisk together the sugar, cornstarch, cocoa, espresso powder and salt in a medium saucepan. Whisk in ¼ cup of cold heavy cream and continue whisking until the mixture is smooth. Repeat with another ¼ cup of cream, then whisk in the egg yolks.
- 5
Place the saucepan over medium heat and gradually whisk in remaining cream and milk. Bring the mixture to a boil, whisking constantly. Boil for 1 minute, then pour the hot mixture over the chocolate and butter.
- 6
Whisk or stir until the mixture is smooth, then pass the custard through a fine mesh strainer to remove any lumps or pieces of cooked egg.
- 7
Place the mixture in a large, shallow bowl and place plastic wrap directly on the surface to prevent a skin from forming. Refrigerate until the mixture is thoroughly chilled. When the mixture is chilled, use a rubber spatula to scrape it into the cooled pie crust. Level the top with an offset spatula.
- 8
To make the whipped cream, place the chilled cream in a mixing bowl fitted with the whisk attachment. Whisk until soft peaks form. Add the sugar and vanilla and continue mixing until medium peaks form. Spoon or pipe the whipped cream onto the pie.
- 9
If not serving immediately, the cream can be chilled separately and piped onto the pie just before serving.
Say whaaaaaat?! This looks fabulous!
Say whaaaaaat?! This looks fabulous!
One of my favorites! Love chocolate pie! And can I just say how much I LOVE that pink polka dot napkin.
One of my favorites! Love chocolate pie! And can I just say how much I LOVE that pink polka dot napkin.
Oh man, Shane would go crazy for this! We’ve been struggling to come up with a dessert for a Christmas Eve party, and I think this pie would be perfect!
Oh man, Shane would go crazy for this! We’ve been struggling to come up with a dessert for a Christmas Eve party, and I think this pie would be perfect!
I am not really a huge chocolate lover either, but chocolate cream pie will always have a special place in my heart as my mom always used to make it for the holidays. She didn’t really do a from-scratch version, so I’l definitely be trying this!
I am not really a huge chocolate lover either, but chocolate cream pie will always have a special place in my heart as my mom always used to make it for the holidays. She didn’t really do a from-scratch version, so I’l definitely be trying this!
Unlike you, I was born with an ability to devour mass amounts of chocolate instantly 😉 This filling makes me want to swoon. Also, that plate is just too cute!
Unlike you, I was born with an ability to devour mass amounts of chocolate instantly 😉 This filling makes me want to swoon. Also, that plate is just too cute!